Canada is known as one of the best places to live in the world, and many people dream of visiting this beautiful country. Whether you’re attracted to its snow-covered mountains, stunning waterfalls, simple countryside life, or well-planned cities, Canada has something for everyone. If you’re from Pakistan and planning a trip to Canada, the first thing you need is a Canada Visitor Visa.
“Embark on your Canadian journey! Discover a hassle-free guide for Pakistanis applying for a Canadian visit visa. Your adventure starts with our simple steps.”
Getting a visa can be confusing, especially if you have a “green passport.” That’s why I’ve created an easy guide on applying for a Canadian tourist visa from Pakistan. While many websites offer advice, they’re often incomplete or hard to follow. My guide simplifies the process for everyone.
This guide isn’t just for people in Pakistan; it’s almost 98% the same process if you’re applying from India, Bangladesh, the Middle East, or anywhere else in the world. No matter where you are, this blog post can help you because the online process for a Canadian visitor visa is the same everywhere!
I’ll explain everything in this blog post in simple English so my readers can understand it easily. I get lots of messages on social media asking how to apply for a Canadian visitor visa. It’s impossible to reply to everyone individually, so I’m writing this blog post to explain the process in simple terms.
If you have a computer and a bit of internet know-how, you can do it yourself. No need to pay agents thousands of dollars for a visitor visa. Why spend more when you can do it from home for less than $200?
If you find this post helpful, please share it with your family and friends; it might help them too. And if you want to be extra sweet, subscribe to my YouTube channel to support my growth there. 🙂
Enough I guess, now let’s dive into the real topic!

If you don’t have dual nationality with Canada, the United States, or any other country besides Pakistan, you’ll likely need a visitor visa to travel to Canada. However, if you have dual nationality, you might only need an Electronic Travel Authorization (ETA) to enter the country.
Different Kinds of Visas for Canada
Before we dive into the details of applying for a Canada Visitor Visa, let’s understand the main types of Canadian visas you can apply for:
Visitor visas
Work visas
Student visas
Business Immigrant visas
Express Entry Program visas
Permanent Residence visas
If you’re planning to apply for a Canadian visa from Pakistan, you first need to determine which type of visa suits your purpose. If your visit is for meeting family, friends, or recreation, you’ll apply for a Canada Visit Visa. If you plan to study or work, you might need a Student Visa or Work Visa, both considered Temporary Visas. Permanent Residence visas, Business Immigrant visas, and Express Entry Program visas are for those intending to stay in Canada for a more extended period.
Choose the visa type that matches your visit’s purpose. In this guide, I will focus on the Visitor Visa, also known as a Temporary Resident Visa (TRV).
Canadian Temporary Resident Visa (TRV) – A Simple Guide
The Canadian Temporary Resident Visa (TRV) is for people who want to visit Canada for a short time, usually six months or less. People often get this visa for tourism, family visits, or business reasons. However, while on this visa, you cannot look for a job, join a study program, apply for Canadian citizenship, claim health coverage, or apply for any government documents.
If you’re coming for a short-term study program that lasts less than six months, you can apply for a Canadian visitor visa after explaining your reason for the visit.
Now, let’s look at different types of Canadian Temporary Resident Visas based on the purpose of the visit:
- Canada Visitor Visa (Tourist Visa): This is the most common visa for people in Pakistan who want to visit Canada for tourism.
- Canada Super Visa: This special visa is for parents and grandparents of Canadian Citizens and Permanent Residents. It allows them to visit their family for up to two years at a time.
- Canada Diplomatic and Official Visa: Government officials and diplomats can get this visa for official visits to Canada.
- Canada Courtesy Visa: This visa is for government officials and diplomats who don’t qualify for the Diplomatic and Official Visa.
- Facilitation Visa: Canadian citizens with dual nationalities who don’t have their Canadian passports can use this visa to enter the country.
- Business Persons and Business Delegations Visa: Business executives and delegations can get this visa to attend seminars, workshops, meetings, conferences, and participate in trade shows.
- Dual Intent Visa: This visa is for people who plan to apply for a permanent resident visa while staying in Canada.
Eligibility for Canada Visitor Visa
To be eligible for a visitor visa to Canada (or any other temporary visa), certain criteria must be met. Here’s a straightforward breakdown:
- Age: The main applicant must be at least 18 years old.
- Passport: A government-issued passport is needed with at least one blank page for visa stamping (excluding the last page). The passport must be valid for at least six months.
- Documents: Identity, education, and family documents must be translated into English or French.
- Clean Record: No criminal history, human rights violations, or immigration-related convictions.
- Funds: Sufficient funds are required to cover the stay in Canada and pay visa application and processing fees.
- Ties to Pakistan: There should be enough ties in Pakistan, like family, job, or university connections, to convince visa officers that the applicant will return to Pakistan after the visit.
In addition to these eligibility criteria, specific requirements must be met when applying for a Canadian tourist visa from Pakistan:
- Itinerary: An itinerary of the places you plan to visit in Canada.
- Travel Details: Details of flights and hotel bookings.
- Stay Arrangements: If staying with family or friends, their details will be required.
Note that these requirements may vary case by case. While you’ll get a complete list of documents needed when you sign up on the official Government of Canada website for Immigration and Citizenship, it’s crucial to meet these requirements. Failure to do so might result in visa application rejection. In some cases, the visa officer may request additional proof to be submitted to their consulate.
Understanding Multiple Entry and Single Entry Visas for Canada
When applying for a Canada Visitor Visa, you’ll be considered for either a multiple entry or a single entry visa. Let’s break down the key differences in simple terms.
Multiple Entry Visa:
- What it allows: You can enter Canada multiple times within a specified period.
- Duration: Typically valid for 10 years.
- Stay: You can stay in Canada for up to six months each time.
Single Entry Visa:
- What it allows: You can visit Canada only once.
- Duration: Limited to a single entry.
Whether you get a multiple or single entry visa depends on factors like your purpose of visit, travel history, ties in Canada, and more. A border officer may also stamp a date on your passport or provide a document called a visitor record, specifying the date you must leave Canada. Keep in mind that this stamp might allow you to stay for a period shorter than six months.
Now, let’s look at the checklist of documents you need to apply for a Canadian visa from Pakistan. These documents should be in English or French, and the requirements may vary based on your situation.
Required Documents:
- Valid passport
- Identity documents (e.g., National Identity Card, Family Registration Form)
- Completed Canada Tourist Visa Application form (You can do online or paper based)
- Proof of funds (e.g., bank or financial statement) (Last six months bank statement)
- Travel itinerary with flight reservations and hotel bookings (Dummy is fine, because I also used dummy)
- Letter of invitation if visiting family or friends in Canada (If you do not have, its okay because I also did not have but if you can get one then it’s much better)
- Proof of relationship for immediate family visits (siblings, parents, children) (If you get an invitation letter from Canada, then you need to proof the relationship between you and the invitation letter sender, if you do not have any invitation letter then you do not need this)
- Immigration statuses of the family or friends you’re visiting (If you get an invitation letter from Canada, then you need to show proof of that person for example his or her Canadian passport copy or residency document. If you do not have any invitation letter then you do not need this))
- Bank statements of your family or friends if they’re covering your trip (If you do not pay for your trip and someone else is paying for your trip, then you need to show that person bank statement)
- Educational documents (degrees and diplomas) (If you have, or if you do not have then no need)
- Employment letter stating your contractual obligations to return home (If you work somewhere, you need a letter from that company saying that the company has no objection for your trip to Canada, if you have your own business, then you can show any proof of your own business)
- Property deed, lease, or rental agreement proving you’ll leave Canada (Provide evidence of your property in Pakistan and, if applicable, your marriage certificate. Any documentation supporting your commitment to return to Pakistan strengthens your visa application.)
- Court documents or police clearance certificates showing no criminal history (If you can get this one, its much better)
- Medical records (If you have or had any serious illness, then you need to show medical records of that otherwise leave this step)
- Travel insurance (It’s good to have and show. You can obtain it from a travel agent or online, and it’s not too pricey. Get travel insurance only for the time you plan to stay in Canada.)
- Declaration Letter to the Government of Canada explaining why you should get a visa (It means writing a letter where you explain to the Canadian government why you believe you should be granted a visa. It’s a way for you to state your reasons and make your case for being allowed to visit Canada)
- Two recent photographs meeting Canada’s photo requirements. (The frame size must be at least 35 mm X 45 mm (1 3/8″ X 1 3/4″) with white background is fine)
Make sure you follow these guidelines to increase your chances of a successful visa application.
How to Apply for a Canada Visitor Visa – A Simple Guide
If you’re planning to visit Canada from Pakistan, there are two ways to apply for a visitor visa: online or manually paper based.
Online Application:
- Recommended for being more time and cost-effective.
- No charges for courier and quicker processing.
- System notifies you about missing documents or incomplete information.
- Easy submission of additional documents online if needed.
- Check your application status through your online account.
Manual Application:
- Involves relying on regular mail for document exchange.
Whether online or in person, a visit to the Canadian Consulate for an interview or biometrics may be required.
Applying Online – Step-by-Step Guide:
Step 1: Visit the official Government of Canada website, go to ‘Immigration and citizenship,’ then click ‘Visit.’
Step 2: Click ‘Find out if you need a visa’ and fill out a survey to determine if you need a Canada visitor visa or an ETA. If you don’t have dual nationality with Canada, the United States, or any other country besides Pakistan, you’ll likely need a visitor visa to travel to Canada, so you can skip this step and go to the next step as mentioned below.
Step 3: If you have only Pakistani nationality, click ‘Apply for a Visitor Visa‘ and then the new page will open, select How to apply click on that. After that a new page will open by asking Why are you applying for a visitor visa? You can select the option you want and click Continue, then scroll down the page where you will see more information about the documents you would need and at the bottom you will see Apply through the IRCC Portal button, click on that if you have already IRCC account then sign in. If you are new and first time then click on Get an invite code to create an account option and click on Get Invite Code button.
Step 4: The next page will ask for your email address, enter your email address there and click on Get Invitation Code Button.
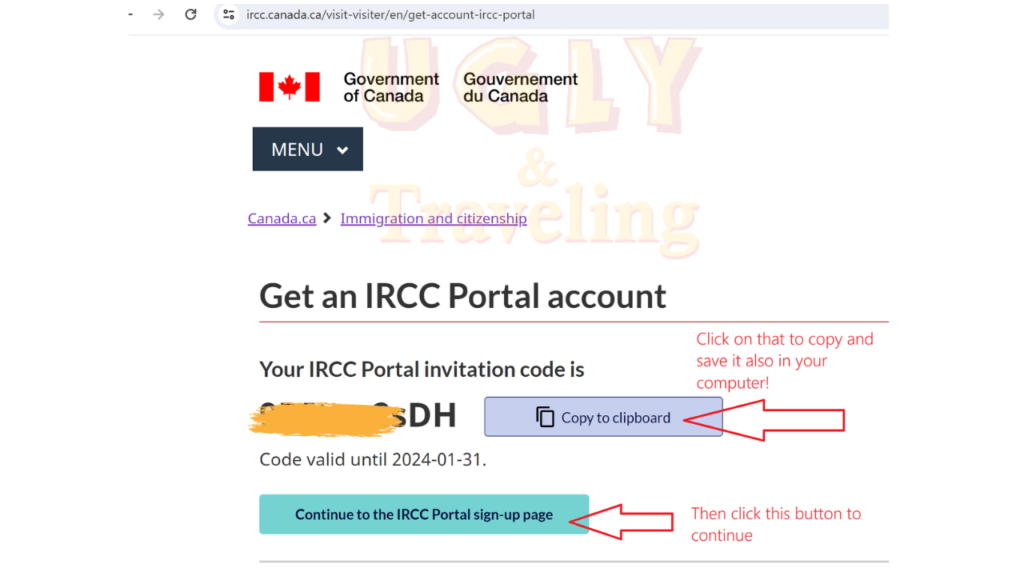
Step 5: Then a Sign Up page will open same as I showed you in the below screenshot, paste or write your invite code there along with your email address, password, etc just fill the whole form with correct information.
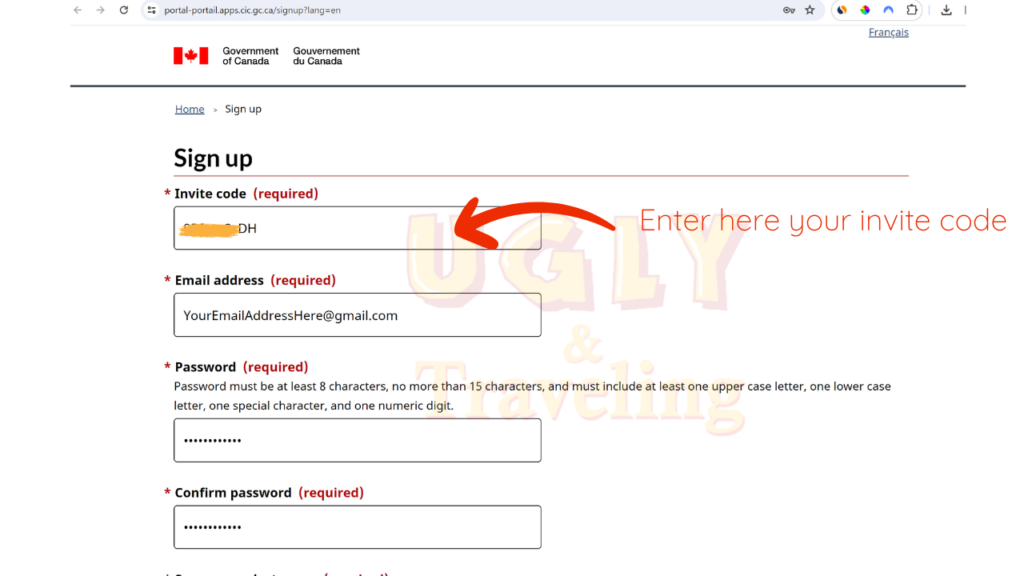
Once you fill the whole form with your details and complete the step, then you will get verification code in your email address. Just go to your email’s inbox/ spam or junk folder.
You will see a link in the email and code, click on that link, the new page will open where you will enter your email address and the code, then click on Confirm button.
Then you will see a message like I showed you in the below screenshot, it means you have successfully completed the registration on IRCC portal.

After that, you can sign in with your email address and password, the next page you will see Terms and conditions, just scroll down the page and click I Accept or I Confirm button. It will take you to the new page which is your IRCC Dashboard, it will look like same as I showed you in the below screenshot. All your visa application related updates will show there and you need to check that time to time to see your application processing status.
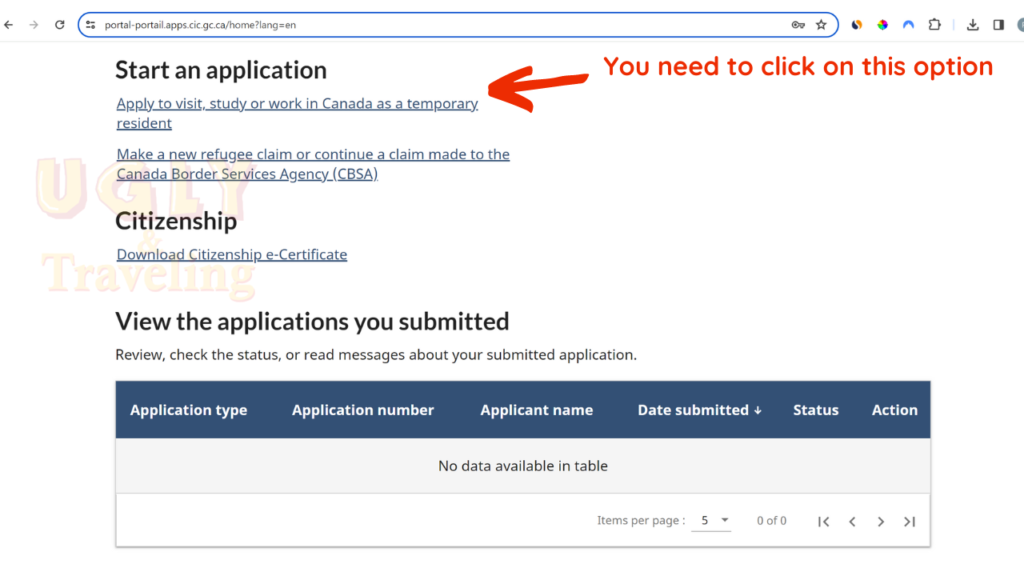
Don’t be so happy, now you are not yet done, it was just creating an IRCC account and the next step is to start working on your application. Don’t worry I will try my best to explain in easy English and step by step process so that my all users can understand easily. 🙂
Step 6: Once you click on Apply to visit, study or work in Canada as a temporary resident link, it will take you to a new page. Read everything there carefully then click on that small box next to I acknowledge that I’ve read and I understand the above information. I’m ready to start my application. Same as I showed you in the below screenshot;

Step 7: When you click on that Start application button, it will take you to a new page and ask Do you want to apply for more than 1 person at the same time? just select No and click on Save and continue button;

It means you are applying visa for only one person, if you are also applying with anyone then you need to select YES. But I am talking in this post about single person visitor visa, so I selected No.
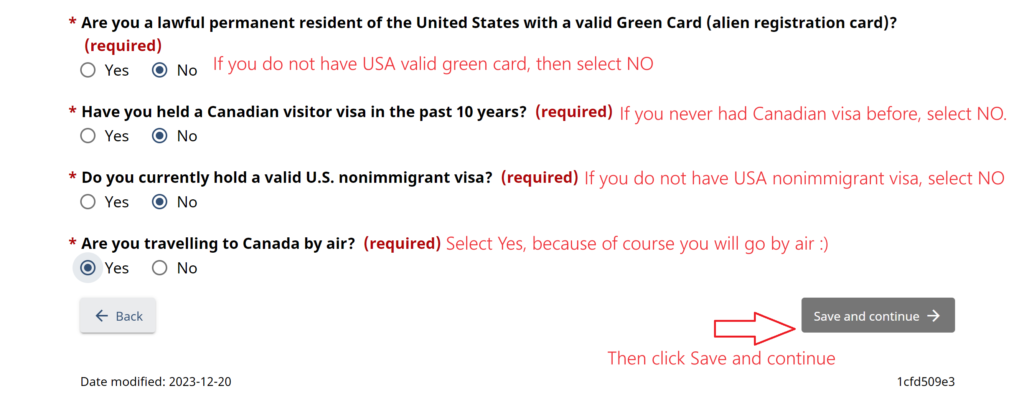
After clicking on Save and continue button, then it will take you to the next page, which will look like below screenshot;
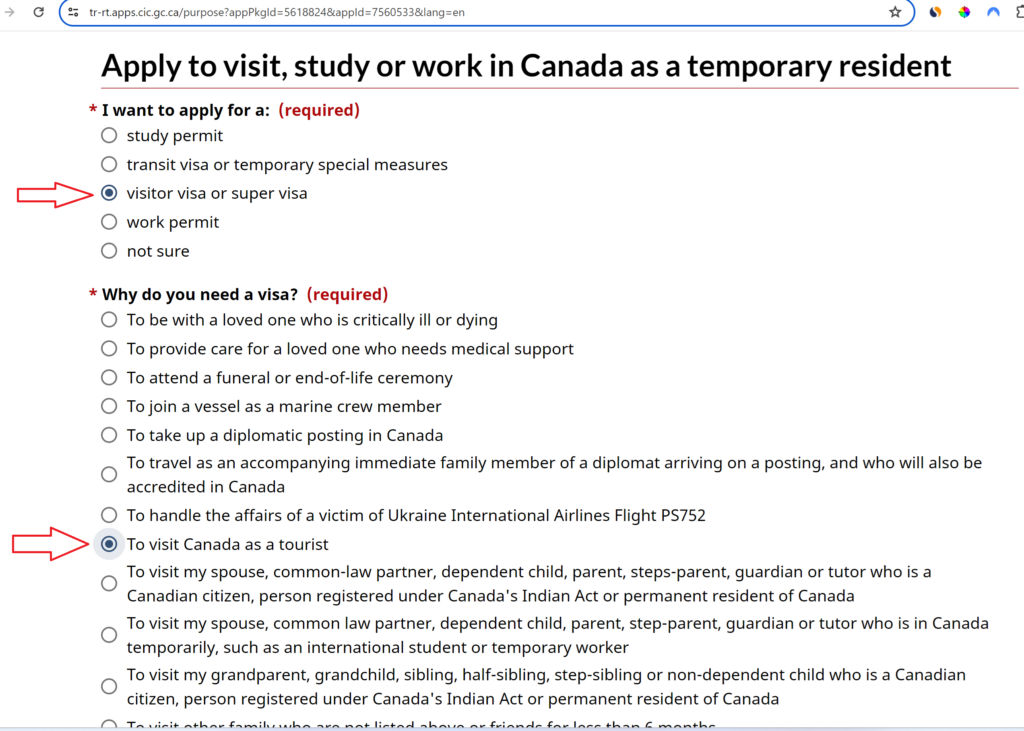
Select those two options as I showed you above and scroll down the page, you will see more information like I showed you in the below screenshot;
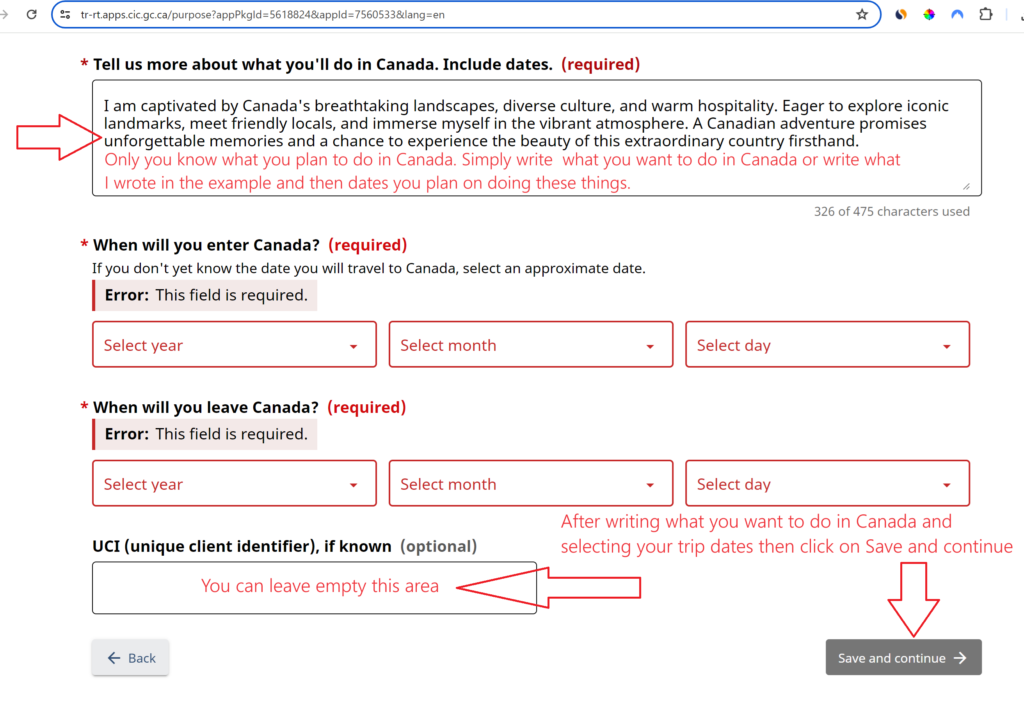
Once you click on Save and continue button, it will take you to a new page, read everything there carefully because that page will tell you what information they will ask from you in the next steps. Then click on continue to application button.
The new page will open which says Representative, looks like below screenshot, just select No and click on Save and continue button.

The new page will open which will look like below screenshot, it will ask for your personal information. So fill that page with your correct information and click on Save and continue button.
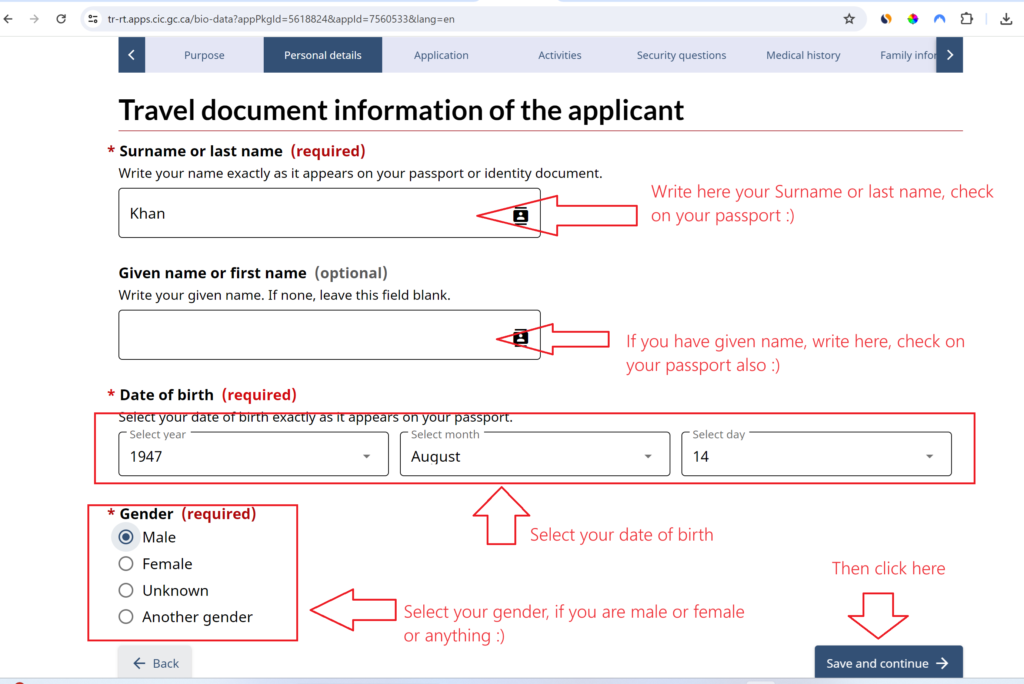
The new page will open, it will ask for your passport details, so you can fill that as I can not give so many screenshots here otherwise the post will be so lengthy. I am trying to explain only the difficult part which most of the people can not understand.
Once you fill your passport details then scroll down the page and you will see something like I showed you in the below screenshot,
In the next page, it will ask about your country and city of citizenship, the page will look like below screenshot. Just fill that page with your own information;
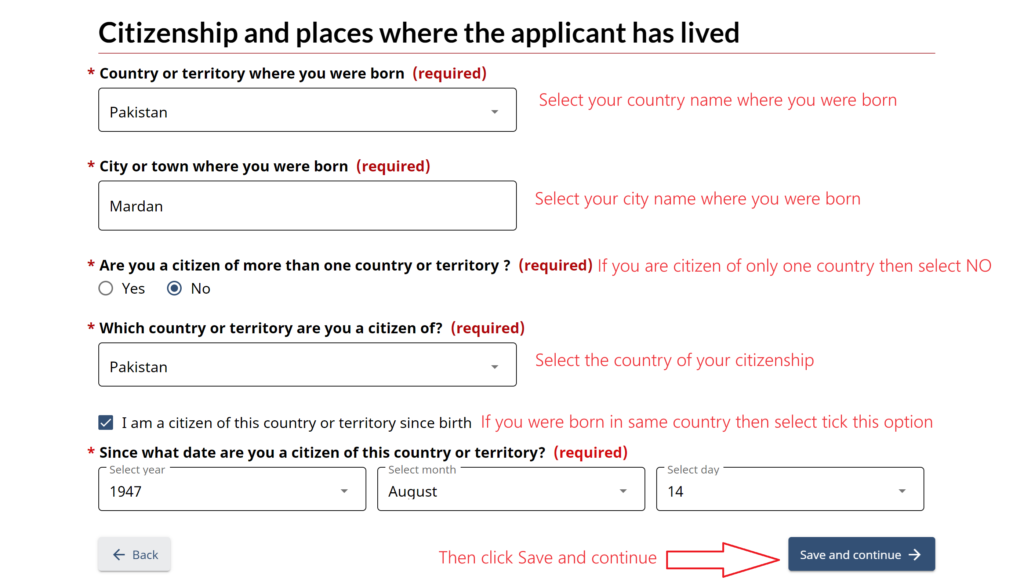
When you click on Save and continue page, it will take you to next page asking for Do you have a valid national identity document? fill that page with your ID card (Shanakhti Card) details and click on Save and continue button.
The next page will open asking for, Have you used another name in the past? just select NO and click on save and continue button.
The next page will open about residential address, fill that page with your residential details and click on Save and continue button.
The next step is about Biometrics, if you never gave finger prints before Canadian visa then select No and if you gave before then select Yes and click on Save and continue button.
In the next step, it will ask about How much money do you have for your stay in Canada? you need to mention the amount in Canadian dollars. (Convert Rupees into dollars and write it there). Click on Save and continue!
The next page is about your education history and work/activities history, so fill that section and click on Save and continue button.
After completing the above step, the next it will ask for travel history, fill that section with your own information and click on Save and continue button.
Then there are small small steps such as Criminality and security and medical exam, keep filling them with correct information and continue.
You can relax, drink some water or coffee (chai), we are are almost completing the application.
The next step is about Family information, just fill section, at the next stage it will ask for Language, which language you speak and understand. In next stage it will ask again your email address, just fill that section your email address.
After language details, it will ask for your mobile number, once you fill that page with your contact number details then it will take you to the last Summary of your information page. You can scroll down the page and double check all your information and make sure everything is correct.
Once you are satisfied with your information and everything is correct then click on Save and continue button.
You will see a new page Documents to support your application! That is the place where you will upload your scanned documents, the page will look like the below screenshot;
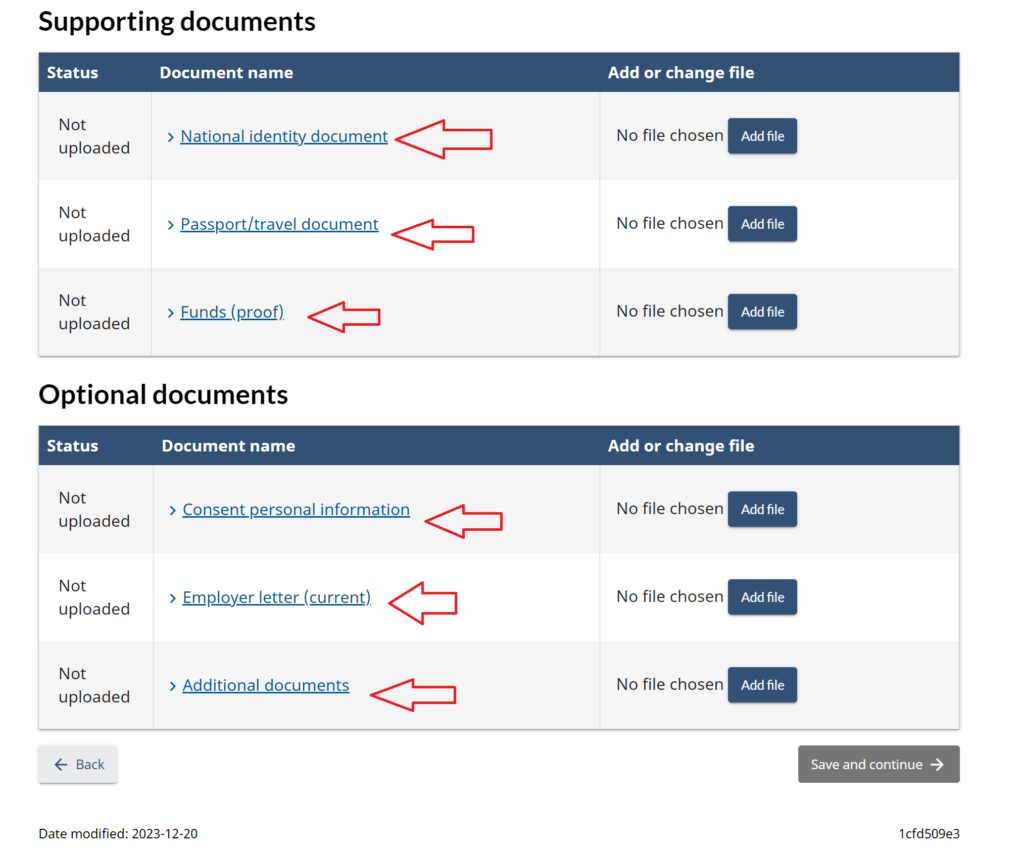
In the first upload option (National identity document), this is your national ID (Shankthi Card)
In the second upload option (Passport/ travel document), this is your passport copy
In the third upload option (Funds, proof), this is your 6 months old bank statement
In Optional documents section
The first upload option (Consent personal information), if you are not giving your case or application access to anyone then you do not need to upload here anything, if you alone will manage your application then leave this empty.
In the second upload option (Employer letter), if you are working, then you need to take NOS from your company and upload here, if you are owner of your business, then upload any proof of that.
In the third last upload option (Additional documents), if you have travel history, just merge all your travel history in one pdf file, upload it here. If you have properties on your name, upload here, if you are married, upload your marriage certificate, anything you think can make your visa application strong and can show that you have strong ties with your home country, upload here in the additional documents.
Once you upload all the scanned required documents and submit your application with the fee using a valid Credit or Debit Card.
So, now we have completed our online Canadian TRV visitor visa process, next is very important step and that is biometric (finger prints).
If you have given your biometrics before for Canadian visa then you do not need to give again, because your first biometrics are valid for 10 years. However, if this is your first time applying Canadian tourist visa, then you must give your biometrics to complete your application process.
Schedule an appointment for biometric enrolment
In this blog post, I will give an example of Islamabad biometric center, if you are in Karachi, you can google the the VFS website in your region. If you are in KPK, then you will have to go to Islamabad VFS office for biometric. But before going to the VFS office, you need to book an online appointment with VFS.
This is VFS Global Islamabad biometric booking website, go to that website which will look like below screenshot and you will see 5 options to book the appointment for your biometrics. You can select any option you want but I will talk about Online appointment for biometric here in this post.

Once you click on that Online option, it will open a new page and it will say Please click here to schedule an appointment, so you need to click there to go to the appointment page;
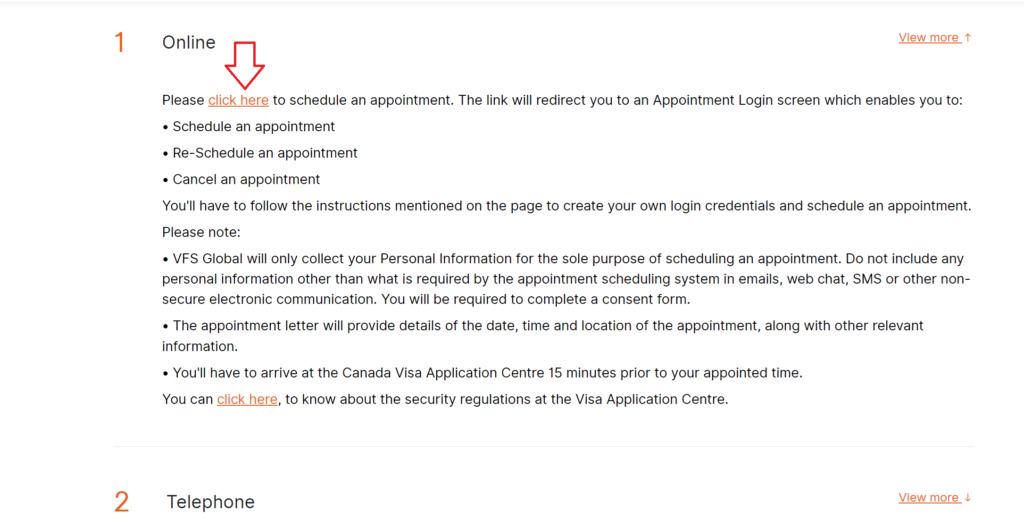
When you click on that option I showed you in above screenshot, then it will open a new page like below screenshot;
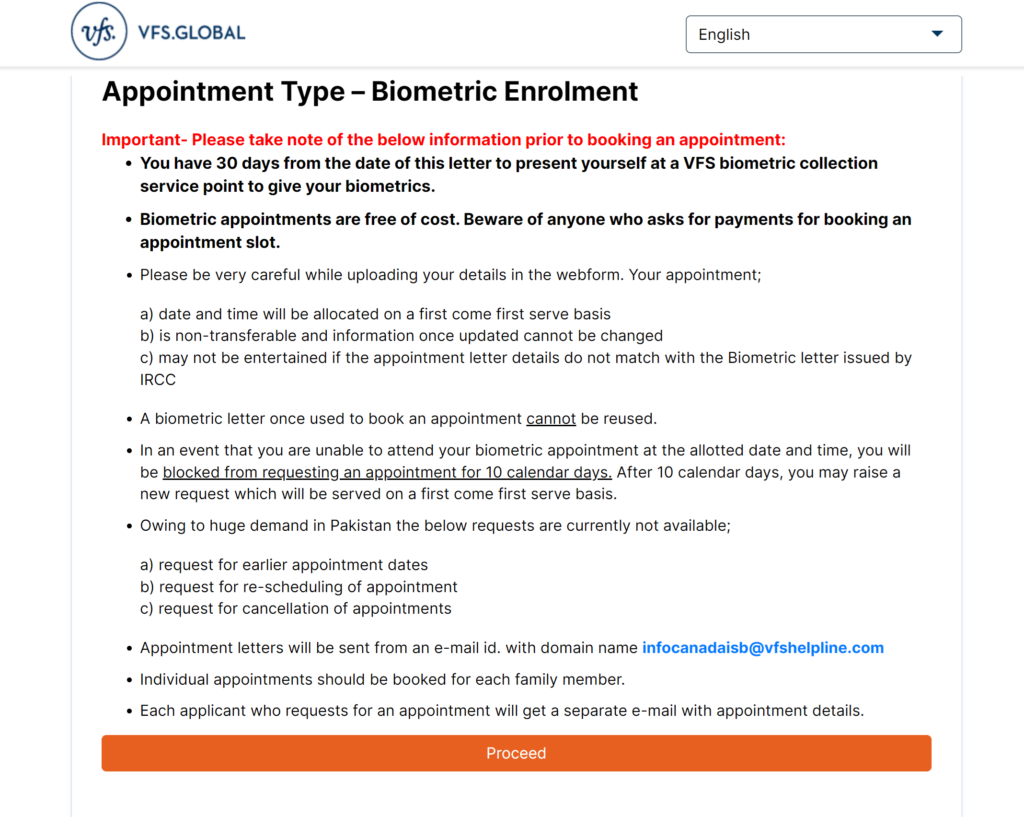
You must read carefully that page and understand it, then click on Proceed button as showing in above screenshot. You will see the next login page, there you need to enter your email address and you will receive a one time password in email. So simply register and login there and look for dates for the appointment, once you select the date and time then you will proceed to make payment.
Let’s say you have completed your biometric process, then you will receive email confirmation also. I think maybe in Pakistan you can not make payment online for biometrics. I am not so sure because I applied myself from Dubai. You need to check that or google is your best friends. 🙂
But if in Pakistan if there is no online payment option then you will most likely pay it cash direct when you go the VFS office for biometric.
Final Step: On the appointment date, make sure you are at the VFS office on time. You need to take your original passport along with all the documents. They maybe will take a short interview during the biometric (additional fee for biometrics if you did not pay online).
(For me there was no interview because I applied from Dubai for my Canadian tourist visa.)
Once your biometrics are done, come back home and relax.
Time to time, you can check your IRCC portal account, it will be updated there that your biometrics received and then after few days, you will see updates there that your application is under process. Sometimes they ask for additional information, so keep an eye on your IRCC portal account.
If all go well and visa officer approves your visa, you will receive an email in your inbox that there is an update in your IRCC portal. So you need to login to your IRCC portal and see the update, if the update says submit your original passport, then it means your visa is approved, WOW Congrats, Mabrook!
But sometimes, it can break your heart too, because my Canadian visit visa was rejected twice, so my heart was broken twice hahaha but on the third try I got the good news and my visa was approved.
On the IRCC portal, if they say submit your passport then you must submit your passport within 30 days otherwise your visa will be rejected. Once you submit your original passport to the VFS office, they will take your courier address and after few days they will send your original passport by post or if you want to pick it up from them that also you can do.
Now, you can start planning for your trip to Canada, keep remember me in your prayers because I want to help everyone out there. There are thousands of websites where they tell you how to apply for Canadian visitor visa, but you will never see this kind of post on the whole internet, because I tried to explain in very simple English so that everyone can understand it easily.
Canadian visitor visa application fee
Curious about the cost of applying for a visitor visa to Canada? Let’s break down the Canadian visa fees in Pakistan for the year 2020.
- Visitor visa application fee: $100 CAD
- Visitor visa application fee per family (5 or more people): $500 CAD
- Extension of stay per person: $100 CAD
- Biometrics per person: $85 CAD
- Biometrics per family (2 or more people): $170 CAD
These are the fees you need to keep in mind when applying for a Canadian visitor visa, depending on your specific situation.
Visa Processing Time for Canada from Pakistan
If you’re applying for a Canadian visitor visa from Pakistan, the processing time typically falls within the range of 10 to 35 days.
Getting approval for a visitor visa means that the Consulate in Pakistan has found you eligible to enter Canada. However, it’s important to note that upon landing in Canada the Customs and Border Control officers in Canada have the authority to deny entry, despite having a valid visa. While such situations are rare, it’s crucial to answer all questions honestly and accurately to avoid complications.
Also, you can check this also If you’re applying for European Schengen visa from Pakistan.
Stay connected to Ugly And Traveling Blogs, share this blog with your friends and family it might be helpful for them also. And by the way don’t forget to subscribe to my YouTube channel to help me grow on YouTube. 🙂
Disclaimer
I’m not an agent or immigration officer. Since I get many messages daily on my social media, asking about how I obtained my Canadian tourist visa, it’s tough to respond to each one individually. That’s why I’ve written this blog post based on my personal experience. Remember, this info is for your knowledge, and for proper guidance, consider seeking professional help.
If you found this blog helpful, It would be great if you could share it with your family and friends who might find it useful as well. Also you can join our traveler community and meet other travel lovers, share tips and travel experiences with each other.
Please subscribe to my YouTube channel “Ugly And Traveling” and watch 4K travel vlogs.
Stay safe and much love!
Traveling with the green 💚 passport
Take only memories✈️leave only footprints.
